 Facebook rolled out Places in New Zealand on Tuesday March 8, 2011.
What this does is allow anyone with a GPS enabled smartphone to ‘Check-in’ to your business, which is instantly posted to their wall and any of their friends walls who they tag during their check-in. A great way to build exposure for your business and increase foot-traffic.
Access Facebook Places from touch.facebook.com on your web enabled smartphone or via one of these dedicated Facebook Apps: iPhone, BlackBerry, Android, HP webOS or Windows Phone 7.
What is Facebook Places?
Facebook defines Places as ‘a Facebook feature that allows you to see where your friends are and share your location in the real world. When you use Places, you’ll be able to see if any of your friends are currently checked in nearby and connect with them easily. You can check into nearby Places to tell your friends where you are, tag your friends in the Places you visit, and view comments your friends have made about the Places you visit. Use Places to experience connecting with people on Facebook in a completely new way’.
 1. Check if your Place exists
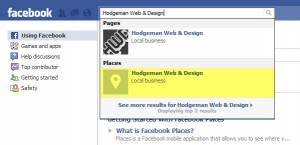
Search for your business name on Facebook via the normal Search bar. If your business’s Place already exists on Facebook, click on it to visit its page and continue from step 3, if not, continue from step 2.
2. Create a Facebook Place
To create a new place, follow these steps:- Access the Places application on your supported device.
- Click “Check In“
- Enter your “business name” in the search box as you’d like it to appear on Facebook.
- Click the Add “business name”… link below
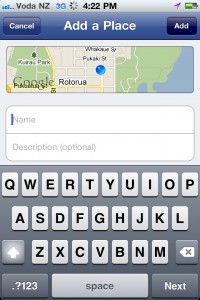
- Check your business name is correct and enter an optional description. Then, click the “Add” button at the top right of the screen. (fig 2.)
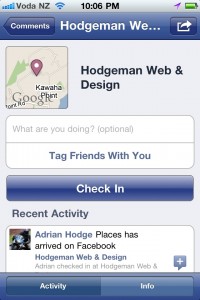
- You will then have the option to both write a description of what you are doing at the new Place, and/or tag your friends there
- Click the “Check In” button to share your visit.
The default location for any new Place you create will be where you are currently located. Also, keep in mind that any Place that you create is public. This means that other people may see your created Place while browsing Facebook or the Places application.
3. Claim your Facebook Place
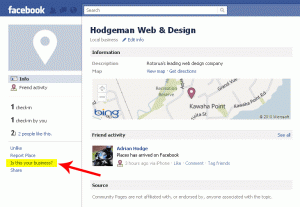 To claim your Facebook Place, search for your business name on Facebook via the normal Search bar. If your business’s Place already exists on Facebook, click on it to visit its page. At the bottom left side of your Place there will be a link that says “Is this your business?” Click on the link and follow the steps.
Facebook will ask you to verify that you are the owner through a phone verification process, or you may be asked for document verification. If your claim is confirmed, you will be able to admin your Place on Facebook.
4. Merge your Facebook Place and existing Facebook Page
[NOT CURRENTLY AVAILABLE]
Once you’ve successfully claimed your Facebook Place, you can merge it to your existing Facebook Business Page.
Visit the Place that you have successfully claimed, and scroll to the “Merge with existing Page” link in the left side navigation menu. Click this link, and a prompt will appear to walk you through the process.
5. Offer Deals to customers via your Facebook Place
[NOT CURRENTLY AVAILABLE IN NEW ZEALAND]
 By offering Deals via your Facebook Places page you’re instantly connecting with potentially thousands of people who have a smartphone and are using Facebook while near your location.
If you’re offering a Deal, you instantly stand out from the rest of the Places nearby, so will attract more views and will encourage more people to visit your business to redeem their Deals.
Find out more from Facebook
Hopefully that’s enough to get you started.
We welcome any comments or feedback.

